It’s raining today. The weather has been weird all year, so I guess I shouldn’t be surprised, but late June in California is not supposed to be like this! We went from warm and sunny to cold and rainy overnight. Neither Bailey nor I feel like going outside in the rain today, so today’s photo-a-day will have to come from the studio.
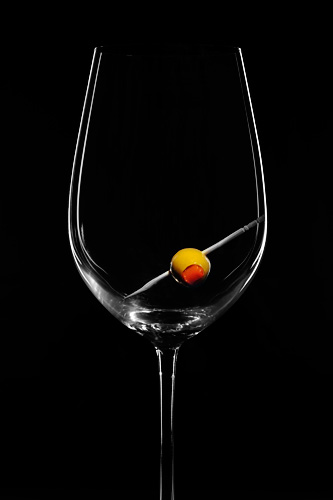
I’m reading a great book on light. It’s called “Light: Science and Magic: An Introduction to Photographic Lighting“. If you have any interest in improving your photography, it’s worth a read. If you do any studio work at all, it’s pretty much a must read. It reads a bit like a text book, but I am finding cool nuggets of information every time I pick it up. The chapter I just finished was on how to light glass, so I decided to try it myself. The above photo is the result and the rest of this article tells you how I did it.
It’s hard to light glass. The tricky thing is that glass reflects everything. So how do you do it? You only want light coming from an angle that lights the edges of the glass. So if you imagine a line going from your lens to the edges of the glass and then back to the background, that’s where you want the lights.
Okay, that won’t work, because then the lights will be in the background. So you want them just out of the frame. If they cause some flare, move them a bit further out of the frame. That’s about it to getting nice clean light edges on a dark background. For this shot, I took a small light box and turned it on its side so the top faced the camera. Then I covered all but about 1.5″ of the left and right edges with black plastic. That gave me the 2 strips of light I was looking for. All that was left was to position the camera to avoid flare from the light sources and to position the wine glass.
(If you want to light glass on a light background, you would do the inverse of what I did here. Light the background and place some black vertical strips just out of frame to darken the edges.)
The olive needed its own light. A very small, focused light. I used a Mini Maglite since it gave me the tight beam that I needed. I just had to make sure that I held it at and angle so none of its light reflected off the glass and into the camera lens. The Mini Maglite introduced some color temperature issues, of course, but I knew I could fix it in Photoshop in post. Normally, when I think to myself “I can fixed that in Photoshop”, I stop and punch myself in the face and take the time to get the photo right in camera. But in this case, I decided that fixing it in Photoshop would be easier than setting up a separate color-correct light with all of the snoots/gobos/etc. that would be required to put the light just on that olive. (Note that I didn’t fully correct the color temperature of the light on the olive. I think it gives kind of a bar-like feel to it how it is.)
I also used Photoshop to clean some smudges/dirt/stray reflections from the glass. No wine glass is going to be completely blemish free and, in any case, it was easy work. I also converted everything in the photo to black and white (except the olive, obviously). I had the glass on a wood table and the wood left a brown reflection on the bottom of the glass. Converting to black and white was an easy way to get rid of that problem. Next time I’d put the glass on a black surface.
Getting an olive to balance on a toothpick the way you want is difficult. So is getting an olive on a toothpick down into a wine glass without dirtying the glass. But I’ll leave the techniques on how to accomplish those tasks as exercises for the reader. (Having an appetite for olives doesn’t hurt here.)
That’s about it. If you are a photographer, give it a try yourself. Knowing how to properly light glasses is a useful skill to know.